Arama:

IT Support Demo – Video

[prisna-google-website-translator]

IT Support Request

The IT support request process is designed to allow end users in an organization to submit a ticket to report technology problems to the IT department. Problems can range from a broken computer mouse to lack of server access. With ProcessMaker as the workflow solution to this process, tickets can be submitted and escalated as needed as well as recorded and logged for future reference.

Part 1

When a user has a problem that they need to report to the IT department, they launch a new case in ProcessMaker and select the IT Service Request process. The first Dynaform displayed will automatically fill in the information about the requesting user – such as the user’s name. Other data is also automatically entered and the user simply has to complete the form with the selection of a drop down and a free text box to describe the problem to the IT department. Finally, they can determine the level of urgency from another drop down box.


Part2

When a case is escalated to IT, the first level IT support engineer receives the case. If there is more than one first level support engineer, then each engineer will take turns receiving incoming cases in a ’round-robin’ fashion. The engineer will look over the notes submitted by the end user in read-only format and go ahead and try to resolve the issue – contacting the end user if necessary.

If the first level support engineer can resolve the issue himself, he will select a dropdown box to close the ticket which will assign the case back to the end user to verify that the issue is in fact resolved. If not, the case will be escalated to a second level support engineer.


Part3

The second level support engineer receives the IT support request case if the first level engineer is unable to resolve the issue. At this point in the process, the engineer is able to review all notes in read only format in order to see what has been done to resolve the issue so far. In the process we’ve created here, the second level support engineer is as high as the escalation can go so we will expect the issue to be resolve in some manner at this stage.

Once the second level support engineer resolves the issue, he closes off the ticket by using the drop down box selection and adds notes to record what was done. The ticket will now be passed back to the originating user who will verify that the case is now closed.


Part4

The last task of the process is for the originating user to verify and accept that their IT support request was resolved. They can review the notes on the case which were logged by the IT department and perform their own testing if necessary. If the issue is not resolved, the user can choose not to close the case, add more notes and send the case back to the IT department – which will cycle the case through the tasks again. If the issue is now resolved, then the user simply closes out the case with the drop down box and the case is officially closed and stored in the database.

Purchase Request Demo -Video

[prisna-google-website-translator]

Purchase Request Process

The purchase request process is used by organizations to place and track orders for supplies.  These could be anything from stationary to office furniture or more.  This process allows end users to place an order, receive supervisor approval and most importantly, allow external vendors or suppliers to submit prices for quotes without the need for them to be registered as ProcessMaker users.

To begin, the end user logs into ProcessMaker and begins a case in the purchase request process.  Some of the information about the user is automatically filled in.  However in the initial form there are two dependant fields shown – ‘Category’ and ‘Item’.  The Category drop down field is for the user to select the category of item they wish to request and the item drop down field will change its available options depending on the category chosen.  They select the item, quantity and give a brief description before the case moves for supervisor approval.

When the supervisor receives the case in the purchase request process, they can review all of the information submitted by the originating user.  The supervisor now simply selects whether this is approved or not.  If it is not approved, a comments box appears for them to enter a reason for the decision and the originator will be informed via email of this decision.  If the supervisor does give approval however, the case will move to the warehouse manager (Or inventory controller) for a quote request from the vendors.

In task 3, the warehouse manager can review the information and move forward for a quote request.  Here they can insert as many rows as they wish – 1 for each vendor.  They select which vendor they wish to receive quotes from and the information regarding their contact at that supplier is automatically filled in.  An email will be sent to each specified vendor asking for the price of the item in question.

This task is known as ‘External User Entry’.  Each vendor selected in the previous task receives an email with a link to a form.  The beauty of this is that the vendors have access to this form even though they are not ProcessMaker users.  Each vendor’s form is customized for them, featuring the name of the company and the details of the request.  The vendor simply reviews the request and enters a price with comments.  This form is 100% customizable, so it’s also possible to include more information about the item and even an upload button for the vendor to attach an official quote document.

The case is now residing with the originators manager, who has the final say on which item is purchased.  The manager can now see the information which was supplied by the external vendors and make an informed decision on which item to proceed with the purchase.  This form is designed so that only 1 item can be selected with the use of the check boxes.  The manager then confirms with a yes/no drop down to proceed with the purchase and enters any comments he or she feels is necessary.  At this point the order is placed manually, however ProcessMaker can also be programmed to send another email back to the chosen vendor to confirm a purchase and request an invoice.  In our demonstration process however, ProcessMaker will simply produce a purchasing document with the information about the item.

The final task is handled by the warehouse manager once again who waits to confirm reception of the goods requested.  The warehouse manager can review the purchasing document if he or she wishes with a click on a link provided in the form.  Once the item is received, the warehouse manager will confirm receipt with a drop down field and the case will come to an end.  This fantastic process allows organizations to track requests for items and guides them through the purchasing process from initial order all the way to item delivery and is simple and extremely effective.

Leave of Absence Demo -Video

[prisna-google-website-translator]

Leave of Absence Request

The leave of absence request process is designed so that employees of an organization can request vacation time, sick leave or business trip leave and receive approval quickly and efficiently.  Furthermore, this process can also be used to update human resource systems that keep track of paid sick or vacation leave.

Removing paper forms from the equation and also the supervisor or department head having to take time to sign off on paper and return it, the leave of absence request allows an employee to log in to ProcessMaker and simply begin a case in the leave of absence process.  Before presenting any information, ProcessMaker will verify that the user still has vacation time remaining against a database before displaying the request form to the user.  The user fills out the form with the help of dropdown menus, date pickers and text boxes and presses ‘submit’.  ProcessMaker will then perform a lookup against the submitting user to find out who is that employee’s supervisor and route the case accordingly.

The supervisor is notified of the leave of absence request via email.  All of the information about the user and the request is present in the email with the addition of two buttons labeled “Approve” and “Reject”.  These buttons make it possible for the supervisor to make a decision regarding this request directly from the email without even needing to log into ProcessMaker – perfect for supervisors who are travelling or on the go with their laptop or mobile device.  Once a decision has been made, the employee is instantly notified via email of the outcome of the supervisor’s decision.

The final two tasks of the leave of absence process are for the employee to return from their leave and confirm the number of days that they took reflect the number of days that they requested (The employee could have returned earlier than anticipated).   The supervisor then has the option to concur with this or send it back to the employee challenging the information submitted.  All comments between the two parties are consolidated into a comments history log for the duration of the process.

Once the supervisor is content that all of the information is correct, he will choose to “update the system” whereby ProcessMaker will deduct the number of vacation days taken from the database and produce a summary of how many vacation days the employee has remaining.

ProcessMaker Leave of Absence Request Process

Back to Videos

Credit Application Demo – Video

[prisna-google-website-translator]

Credit Application Process

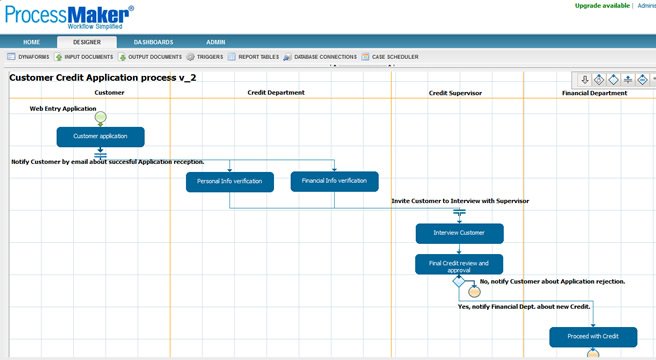
Despite being a slightly complicated and arduous process, the Credit Application Process has been immensely simplified with the power of ProcessMaker. The beauty of this particular process is that it can be initiated by anybody applying for credit from a bank or credit company.

The bank or credit company creates a form that can be hosted on one of their internet pages of their website. Prospecting applicants can navigate to that page and begin the application process by completing the form in its entirety. Various drop downs, grids and other useful fields are featured on the form to make it as user friendly and simple as possible and as with all ProcessMaker forms, the form can be fully customized with colors and graphics for standardization.

When the applicant submits the form, they are emailed immediately to inform them that the application has been received and is being reviewed. It is here that the application is sent to two different recipients of the credit department – one of these people will verify the personal information of the applicant while the other will verify the financial information. Each of these users can only see the information relevant to their task for data security reasons.

Assuming that both users of the credit department successfully verify the information in their relevant tasks, the applicant is emailed again inviting them to attend an interview at the bank in order to answer further questions to support their application. That task also features a form where the interviewer can take notes and complete more information about the request. If this is successful, then the case is passed onto a senior member of the bank in order to have repayment information established and the terms of the credit.

Finally, a manager or supervisor reviews all of the information before the credit is granted to the applicant.

processmaker_credit_application_process_sm

Back to Videos